Front suspension parts including ball joints, eventually wear out, but this sudden onset of slop in your ball joint probably means a lubrication failure. But wait! you say. My ball joints are sealed--there's no grease fitting to pump fresh lubricant into. They're Lubed For Life, like it says right here in the owner's manual.
You've just discovered the true life span of a permanently lubed suspension joint. The lubrication finally dries out, water intrudes inside the ball join boot covering the moving parts, and rust and abrasive road dirt turn a ball joint or tie rod end into a loosey-goosey accident waiting to happen. Do not delay in repairing a failing ball joint or tie rod end. When it fails, the wheel involved will try to part company with your vehicle, and not quite succeed in doing so. This will precipitate two unfortunate events: loss of control at some speed, and considerable damage to the rest of the vehicle.
If your vehicle has a strut-type suspension, or any other type of suspension system that doesn't involve the need to compress the springs and unload the control arms, you can easily replace the worn-out part using simple hand tools. If your vehicle uses upper and lower control arms, you'll need a spring compressor. You can rent one, but in this case we suggest you shop this procedure out to a professional mechanic. The energy stored in the spring is more than adequate to put a hurtin' on you. If the spring compressor slips, parts will fly out of the wheel well at ballistic velocities--probably right at an important part of your body, like your face.

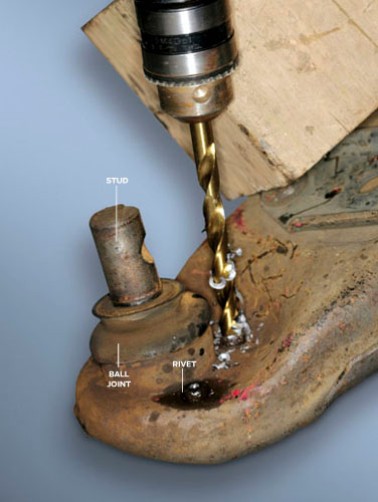
Drill out the old rivets. We used a chunk of wood to keep the control arm out of the way.
Some vehicles, particularly high-end cars, use a sophisticated rear-end suspension setup that may use ball-type joints, and the principles we're talking about here may apply. As always, consult the shop manual for specifics.
One suggestion: If one joint has failed, the other is probably not far behind. As long as you have the tools out and your hands dirty, you may as well do both sides.
We recommend purchasing aftermarket premium-quality ball joints. Odds are they will outlast the OEM parts because they almost always have a grease fitting installed.
Park on a flat piece of concrete. Block both rear wheels in both directions. Loosen the lug nuts a half-turn or so. Jack up the vehicle and support it on safety stands--an old stump or some cement blocks won't cut it. Remove the wheel. I like to toss the removed wheel under the frame of the vehicle near where I'm working. If something goes really wrong, at least there's something thicker than my head between the car and the ground. Your head may vary.
You'll need to lift the entire front end of the car and unload both sides of the suspension, for reasons that will become obvious later. Don't attempt to lift up only one corner.
You'll probably need to remove the brake disc and caliper to get to the fastener between the ball joint and the bottom of the strut or upright--but maybe not. If so, remove the caliper's attachment, and hang it from something with a thick wire to keep from damaging the brake line..
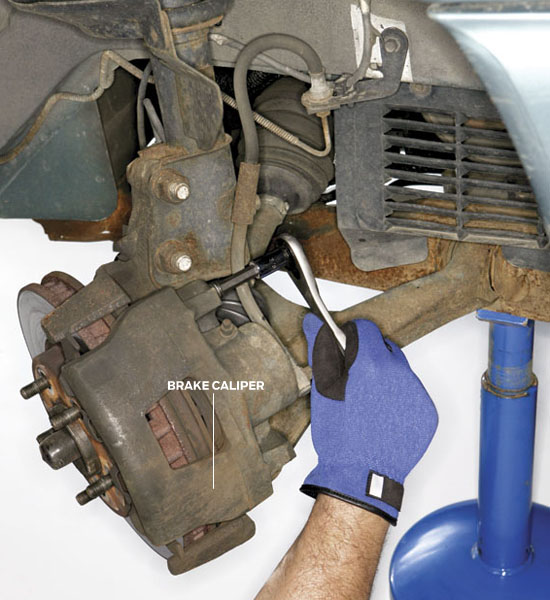
Never let the brake caliper hang by the hose. It could possibly damage the hose costing you even more time and money. use a wire or cord to support the caliper.
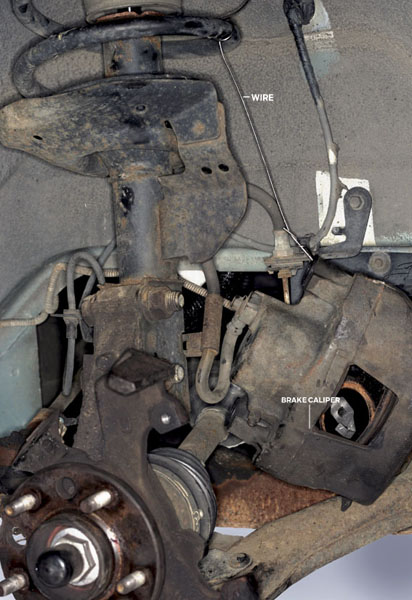
Notice the coat hanger in the top illustration

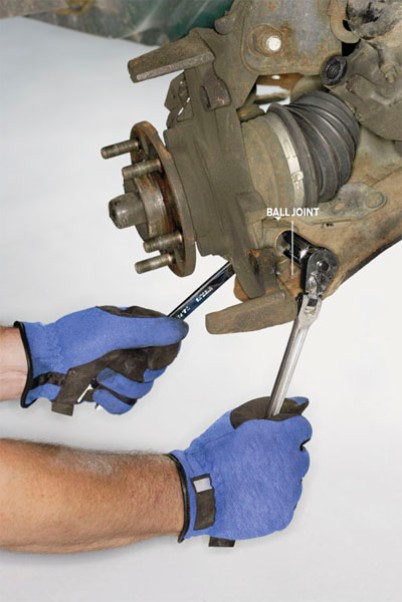
Now you can remove the pinch bolt in the bottom of the strut. This clamps around the ball joint's stud. In a perfect world, you could simply press down on the lower control arm and the stud would drop free of the strut. Well, our world isn't perfect, so that's not going to happen. These two pieces have been mated and bathed in muddy, salty water for years--they're attached. Smack the area with a ball-peen hammer a couple of times to loosen up the attraction. Now you should be able to tap the control arm smartly with a bigger hammer to get the stud to move.
But wait! There's a sway bar thicker than your thumb up against the bottom of the control arm, preventing any significant movement of the arm downward. You have two choices: either raising the strut--which means fighting a spring stout enough to hold up one corner of your car--or dealing with the sway bar. On our example vehicle we got enough clearance by removing the bolts on the bar's clamp on one side of the vehicle. You may need to loosen the clamp on the other side. We didn't, but we did use a big pry bar to get the last inch of suspension travel we needed.
And this is why we told you to lift the whole front of the car--the other side of the suspension needs to be at full droop to allow enough clearance on this side.
Now you should be able to depress the control arm far enough for the stud to clear the strut.
How is your ball joint attached to the control arm? It might be bolted on, in which case all you need to do is remove the bolts and drop in the new part. Some--usually older-style--ball joints are pressed into the lower control arm with a hydraulic press. There are ways to press the old ones out and new ones in, but they involve specialized tools. If you don't want to rent or borrow these, you may have to remove the lower control arm and have the new joints pressed in at a machine shop.
Our example minivan uses a fairly common method of ball joint attachment--rivets. Relax. We're going to bolt the part back together when we're done, so you won't need an air hammer to set any new rivets. Start by center-punching a healthy starter mark in the center of each rivet. To avoid drilling off-center, you're going to drill a 3/16-in. hole most of the way through all of the rivets. Then follow up with a 1/2-in. bit, which will center on the smaller hole. Drill down just until the bit touches the surface of the control arm. Now the ball joint will fall loose with a gentle tap. There should have been new hardware in the box with the new part--do not substitute anything else, as these are critical fasteners.
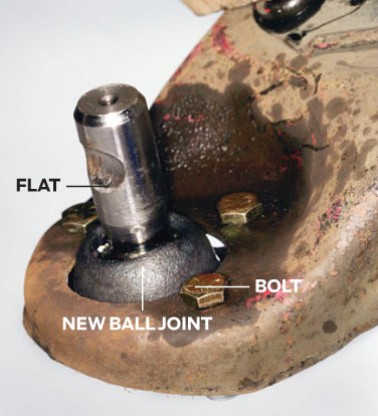
Eyeball the stud. There will be a flat on one side. Index this so the pinch bolt can slide past. Slide the boot over the stud and slide the stud back up into the strut. If you eyeball the pinch bolt's bore from the side, you'll see when you're in far enough. Reinstall the pinch bolt. Screw the grease fitting into its pretapped hole in the joint, and pump grease into it until the boot gets turgid and a little grease leaks out.
Now you can reinstall the sway bar mounting and the brakes. And start on the other side. Remember to take a close look at the tie rod ends. Unlike most suspension work, there should be no need for a front-end alignment when you're done.
Replacing a bad ball joint has never been easier. if you need further help, please feel free to visit our forums and post your questions or comments.
Don't forget to visit our blog