Unlike typical American rear-drive cars, European models generally employ permanently sealed front wheel bearings. (Same goes for just about every front-wheel-drive vehicle on the planet, but that’s a story for another day.) These bearings don’t get inspected as part of a brake job because they don’t reside inside the hub of the brake rotor and can’t easily be removed with just an index finger. Rather, the rotor mounts on a hub that contains the pressed-in wheel bearing. Because it’s all one piece, this sealed bearing hub assembly can’t be serviced. Once you’ve diagnosed a bad one causing potential hearing loss and a rough, grinding sensation that sends shivers through the entire body of the vehicle, the whole unit must be replaced.
That’s actually a good thing because you don’t have to deal with individual bearing races the way you do when servicing a two-piece caged (also called tapered) front wheel bearing. And there’s no annoying cotter pin to deal with. (Watch for an upcoming Saturday Mechanic discussing these types of bearings.) Also, replacement sealed bearing hubs come prepacked with grease from the manufacturer more often than not, so there’s less mess. What’s bad is that sealed wheel bearings typically cost more, generally require more disassembly of driveline components, and may require a hydraulic press to remove and install.
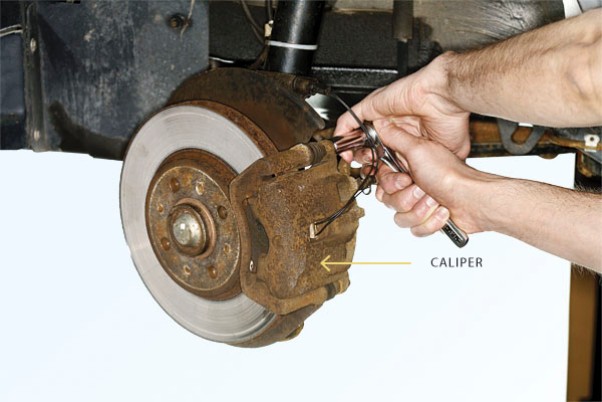
(1) Remove the brake caliper and hang it from some convenient place with wire (like a coat hanger) to keep the rubber hose from being damaged. But the bearings are important, so don’t put off the job. Of all the components that hold the wheels onto your car, it’s the hardened-steel wheel bearings that are subjected to the most stress. When a car is moving, they allow the wheels to spin on their axles (and resist lateral forces during turns) while being pounded by up-and-down suspension movements. Even when a car is stopped, the entire weight of the vehicle--minus the wheels and tires--is bearing down (no pun intended) on the wheel bearings’ rollers. So while a certain amount of play is necessary for normal operation, proper bearing preload adjustment (how tightly the bearings are installed under no load) is critical. |
The wheel bearings keep friction to a minimum. What little drag there is, however, builds up plenty of heat. To stay cool and slippery, wheel bearings need to bathe in heavyweight grease all the time. This prevents metal-to-metal contact. When bearings do dry out, the most common symptom is a high-pitched squeal. Left unattended for a long period of time, this situation can lead to bearing seizure and--in extreme cases--wheel separation from the vehicle.
And there’s another reason for all that lube. It helps keep moisture out of the bearing. Oil and water don’t mix, right? The heavy wheel-bearing grease stays put so water can’t penetrate. That’s why the wheel bearings on routinely immersed boat trailers need extreme maintenance. What about dirt? Wheel bearings are generally sandwiched between a spring-loaded rubber seal (back side of the wheel) and a dust cover (front side of the wheel) that keep out road grime.
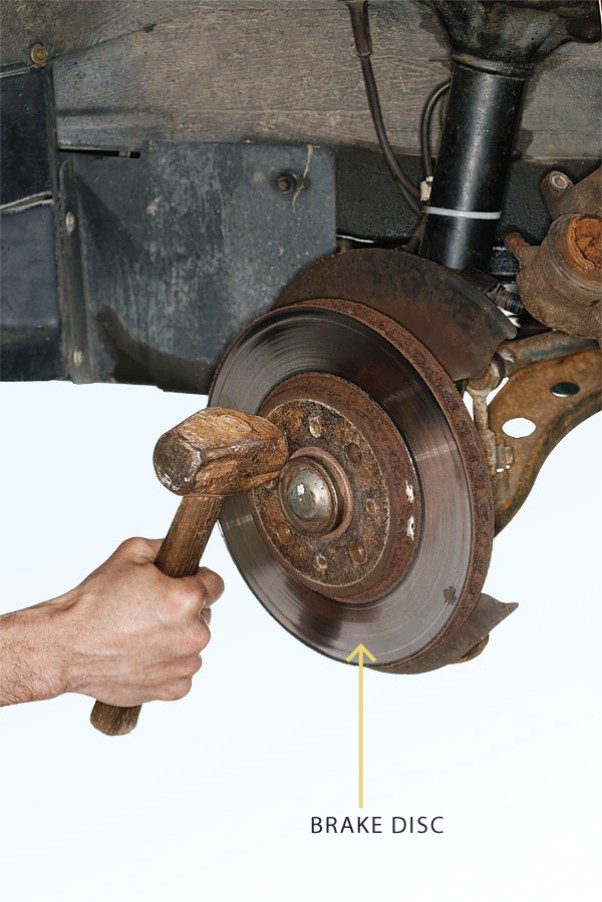
(2) The brake disc needs to be separated from the hub, so we repeatedly tapped the mating area with a hammer to break up corrosion. Didn’t work.
If you’re not working on a lift and using air tools, the first step is to crack the lug nuts/studs loose by hand while the wheels are still on the ground. You can then raise one front wheel at a time or the entire front end, depending on the heft of your hydraulic jack and stands. With the wheel off, unbolt the brake caliper, slide it off the brake rotor and secure it with a wire coat hanger. Never let the heavy brake caliper hang by its rubber hose.
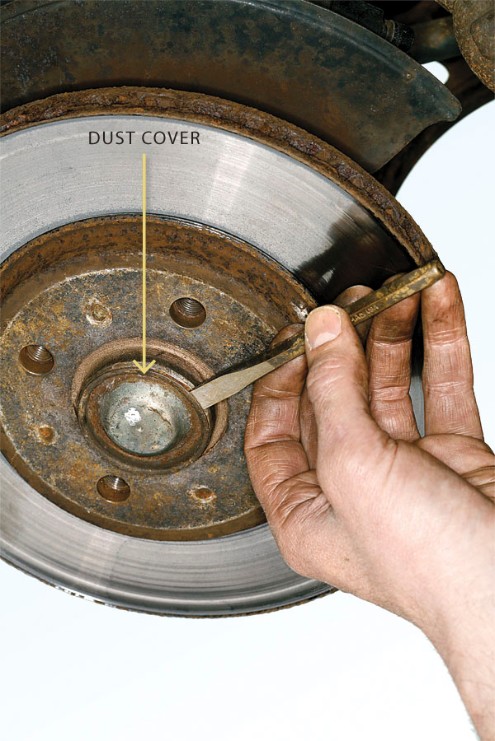
(3) We had to pry the dust cover from the hub to get at the spindle nut. Some vehicles leave this nut exposed; don’t go looking for the missing cover.
The next step is to simply pull the brake rotor off the hub. Only sometimes it’s not that simple. You may need to remove the setscrew that holds the brake disc to the hub. This screw was installed as an aid on the assembly line before the wheels and lug nuts were mounted. Problem is, after years on the road, the screw rusts itself and its components together. Luckily, you probably don’t have to replace this screw after you’ve destroyed it. The lug nuts and wheel will hold the parts in place once you’ve reinstalled them.
No matter how you try to loosen this screw, chances are you’ll round it off. But not to worry. Remove the entire hub assembly with the rotor attached and drill out the screw on a drill press. No drill press handy? Then drill out the screw while everything is still on the car.
To get the hub off, remove its dust cover if there is one. Then be prepared to beg, borrow, steal or buy the giant-millimeter socket required to loosen and tighten that massive axle/spindle nut holding the hub assembly onto the spindle. If you don’t have a megacapacity impact gun at your disposal like we did, plan on using a pipe at least 4 ft. long over a 3/4-in. breaker bar to achieve enough torque to manually crack ’er loose, and to get to the proper bearing preload during reassembly. Hey, we’ve been in the trenches, too. Sometimes you do what you gotta do.
How do you keep the hub from spinning while you’re trying to loosen the axle/spindle nut? You could briefly reinstall the brake caliper and have a helper step on the brake pedal while you stand on your breaker bar and pipe. Or, you could prevent hub rotation with a pipe or other leverage bar jammed between two lugs, or with a large screwdriver or other device stuffed into the brake rotor cooling vanes. One way or another, you must remove that nut and be able to torque it back to spec, which may be as much as 300 lb.-ft.
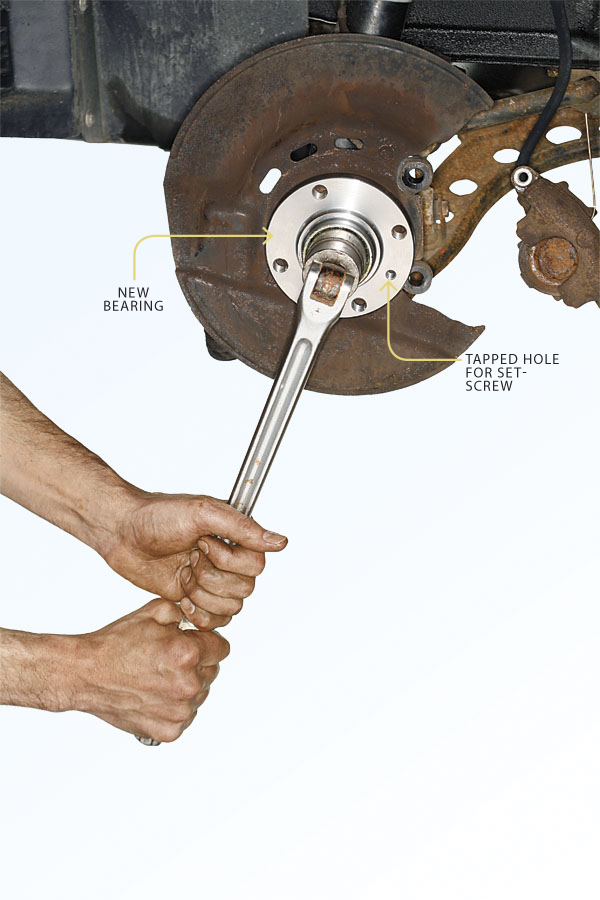
(5) Torque the spindle nut to the car manufacturer’s spec, which is probably pretty close to using all of your weight standing on the far end of the flex handle.
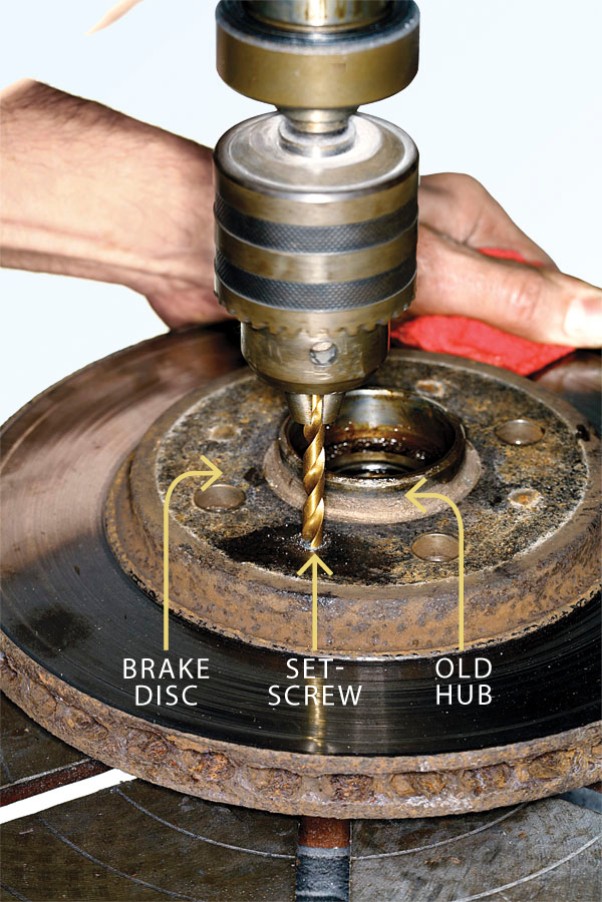
(4) Ultimately, we needed to drill out the retaining setscrew to separate the disc from the old hub. It’s usually not necessary to replace it.
With the old pieces off, wipe the spindle clean and make sure it’s shiny and polished everywhere with no signs of bluing from excessive heat. If the old wheel bearing really did seize, it could have taken the spindle out with it--in which case, you’ll now be into your ride for some big bucks for a new spindle, too.
Next, slide the replacement bearing hub assembly out of its box and check for any installation instructions that might apply to your particular vehicle. Match the new bearing up to the old in every respect to make sure it is, indeed, the correct part. Confident with your purchase? Then slather some fresh wheel-bearing grease on the spindle and slide the new bearing hub home. Torque the spindle nut.
The last step of preparation is often overlooked: cleaning the inside mating surface of the brake disc where it seats on the hub. Rust and crud buildup here over time. Problem is, it can cause lateral runout of the rotor once mounted, leading to brake-pedal pulsation and other problems. Chuck a wire wheel in a drill and clean this area thoroughly. Spread on some antiseize compound or at least some grease for future ease of disassembly. Next, remount the rotor, caliper, wheel and lug nuts/studs. Run the lugs home by hand to seat their tapered bases in the wheel’s holes. With the car back on the ground, torque the lug nuts/studs to spec with a torque wrench in a star pattern to prevent warping the brake rotors.
Last step: Drive, and listen to the sound of the engine--without the squeal of the wheel bearings.